Rubber plants, with their glossy, dark green leaves, have become a favorite in households and offices. These hardy plants are not only visually appealing but also known for their air-purifying qualities. Propagating a rubber plant in water is a simple, yet rewarding gardening task that allows you to multiply these beautiful plants effortlessly.
The key to successful water propagation of a rubber plant lies in selecting a healthy parent plant, making the right cuttings, and providing the appropriate conditions for root growth. This method offers a straightforward and cost-effective way to create new plants from an existing one, ideal for beginners and experienced gardeners alike.
Rubber plants’ adaptability and the simplicity of water propagation make this an excellent project for anyone looking to enhance their green space. The process is not only fascinating but also an environmentally friendly way to expand your plant collection or share it with others.
Rubber Plant Basics
Species Overview
The rubber plant, or Ficus elastica, is a robust houseplant originating from Southeast Asia. Known for its thick, leathery leaves and upright growth, it’s a popular choice for indoor environments. This plant thrives in a range of conditions, making it suitable for various indoor settings.
Ideal Growing Conditions
For optimal growth, rubber plants require bright, indirect sunlight and consistent temperatures. They prefer a well-draining soil mix and moderate watering, allowing the soil to dry out slightly between waterings. Understanding their basic needs is crucial for successful propagation and long-term care.
Propagation Essentials
Tools and Materials
For a successful propagation, having the right tools and materials is crucial. Here’s what you need:
- Sharp, Clean Cutting Tool: A sharp knife or pruning shears are essential for making clean cuts. This reduces damage to the parent plant and increases the chances of successful rooting.
- Clear Glass or Jar: Transparent containers are ideal for monitoring root development and water quality.
- Room Temperature, Chlorine-Free Water: Using non-chlorinated water is less harsh on the cuttings, promoting healthier root growth.
Health and Safety Tips
- Tool Sanitization: Before and after each use, clean your tools with rubbing alcohol or a bleach solution. This prevents the spread of diseases and pests.
- Careful Handling: Rubber plants produce a sap that can be irritating to the skin. Wear gloves and avoid contact with eyes and mouth.
- Stable Work Area: Ensure you have a clean, stable surface to work on. This minimizes the risk of accidents.
Pre-Propagation Steps
Selecting a Healthy Parent Plant
Choosing the right parent plant is vital. Look for these qualities:
- Vigorous Growth: A plant that is actively growing is more likely to provide successful cuttings.
- Disease-Free: Avoid plants with signs of pests or diseases.
- Mature Enough: A slightly mature rubber plant will have more resilient stems for cutting.
Optimal Timing for Propagation
- Growth Phase: Late spring to early summer, when the plant’s growth is most active, is the ideal time for propagation.
- Environmental Factors: Consider indoor conditions if propagating outside of these months. Adequate light and warmth are essential.
Cutting Techniques
Identifying Suitable Stems
- Node Presence: Choose stems with clear nodes. Nodes are small bumps or rings on the stem where leaves and roots can grow.
- Healthy Stems: Look for stems that are green, firm, and free from any damage or discoloration.
Step-by-Step Cutting Process
- Sanitize Your Tool: Wipe the blades with alcohol or a bleach solution.
- Select the Cutting Point: Aim for a 4-6 inch stem segment with at least one node.
- Make the Cut: Use an angled cut just below a node.
- Leaf Removal: Strip off any lower leaves to expose the node and prevent rotting in water.
Water Propagation Setup
Preparing the Container
- Cleanliness is Key: Wash the container thoroughly with soapy water to remove any residues or contaminants.
- Size Matters: Ensure the container is large enough to accommodate the stem without bending it.
Water Selection and Treatment
- Avoid Tap Water: If possible, use rainwater or distilled water, as tap water can contain minerals that may affect root growth.
- Regular Changes: Replace the water every few days to maintain oxygen levels and prevent bacterial growth.
Planting the Cutting
Immersing the Stem
- Submerge the Node: Place the cutting in the water, ensuring the node is fully submerged.
- Avoid Overcrowding: If propagating multiple cuttings, give each one enough space to grow.
Location and Light Requirements
- Bright, Indirect Light: A spot with bright, indirect sunlight is ideal. Too much direct sunlight can scorch the leaves.
- Stable Temperature: Keep the plant in a warm area, avoiding drafts or temperature fluctuations.
Growth Monitoring
Signs of Root Development
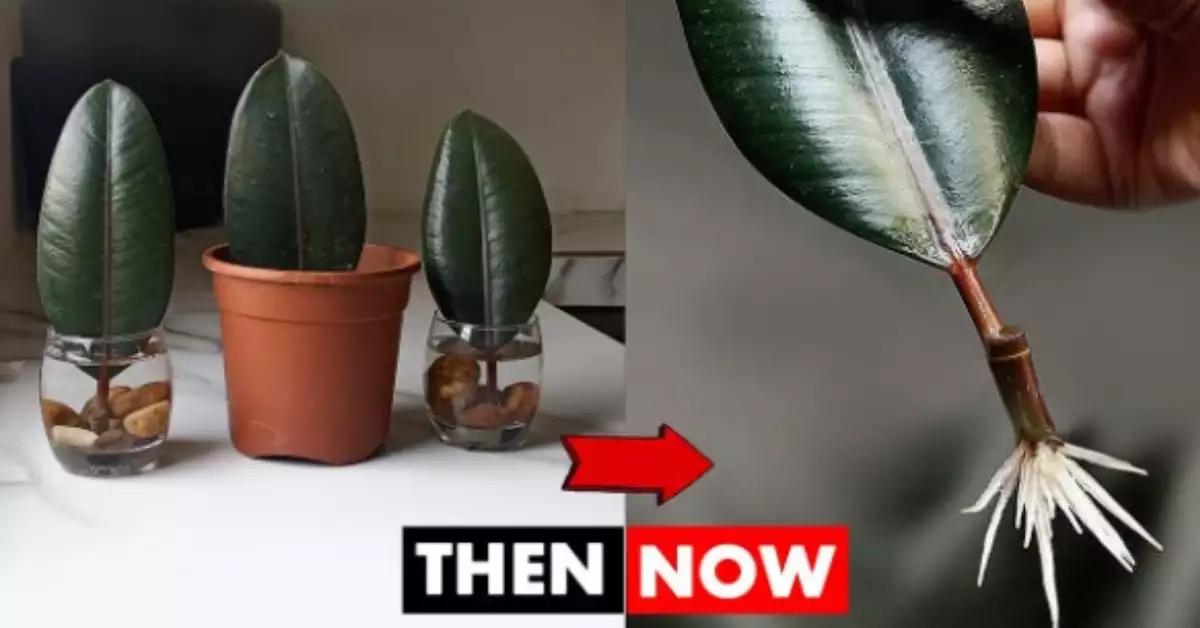
- Root Appearance: Look for small white roots emerging from the node. This can take a few weeks.
- Healthy Root Growth: Roots should be white or light-colored. Brown or mushy roots indicate problems.
Troubleshooting Common Issues
- Leaf Drop: If leaves fall off, it could be due to poor light or water conditions.
- Root Rot: Change the water regularly and ensure only the node is submerged to prevent rot.
Post-Propagation Care
Transitioning to Soil (Optional)
- Root Length: Once roots are 2-3 inches long, they can be potted in soil.
- Soil Choice: Use a well-draining, peat-based potting mix.
Long-term Plant Maintenance
- Regular Feeding: Fertilize every month during the growing season.
- Pruning: Trim back any overgrowth to maintain shape and encourage bushier growth.
Benefits and Challenges
Advantages of Water Propagation
- Visual Appeal: Watching roots develop is fascinating and visually appealing.
- Cost-Effective: It’s a budget-friendly way to expand your plant collection.
- Educational: Great learning experience for children and gardening beginners.
Potential Difficulties and Solutions
- Slow Growth: Be patient, as some cuttings take longer to root.
- Water Quality: If growth is sluggish, try changing the water type or frequency.
Additional Tips
Enhancing Growth Rates
- Warmth and Humidity: These can speed up root development. Consider using a heat mat or placing the container in a humid area.
- Rooting Hormone: Applying a rooting hormone to the cut can stimulate faster root growth.
Propagation Variations and Tips
- Multiple Cuttings: Try propagating several cuttings in one large container for a fuller appearance.
- Leaf Propagation: Although less common, leaf cuttings can also be used for propagation in some rubber plant varieties.
Frequently Asked Questions
How Much Light Do Cuttings Need?
Cuttings require bright, indirect light. Direct sunlight can damage the tender new roots.
Can You Use Tap Water for Propagation?
Tap water can be used, but it’s not ideal due to the presence of chlorine and other minerals. Distilled or rainwater is preferable.
How to Know When to Change the Water?
Change the water when it becomes cloudy or every few days to maintain freshness and provide oxygen to the roots.
Conclusion
Propagating a rubber plant in water is a rewarding and straightforward process. With the right conditions, patience, and care, you can easily multiply these beautiful, air-purifying plants. Whether you are a seasoned gardener or a beginner, water propagation of rubber plants is a fulfilling project that brings more greenery into your life and home.